In this post, you will learn how to connect a domain name to your web hosting with a practical step-by-step guide on Hostinger.
So, let’s see how to point a domain name to any hosting server within a few clicks.

You need to purchase a domain name to connect a domain name with a website hosted on a web server. You can also refer to this detailed guide on how to buy a domain name.
But if you are like, “I have already purchased a domain name, dude 😎h,” you can follow these steps to learn how to connect a domain name to your website.
So, let’s go with the steps on how to connect a domain name to hosting.
Step #1: Find the nameservers of your web hosting provider.
To connect a domain name to your web hosting and provider, first, you must find DNS nameservers from your web hosting provider, which you will need when connecting to your domain name.
Name servers are guidelines that inform your domain name and where to locate the files for your website. The name servers for your website host are typically listed in their support documentation or contact their customer support.
With most web hosting providers, you can find all DNS-related information in your Hosting -> Accounts -> Details.
In this guide, I am showing you an example of hosting from Hostinger and a domain from
I will show you how to point a domain to a Hostinger web hosting provider.
How do I find name servers in Hostinger?
#1: Log in to your hosting account. So, in my case, I’m using Hostinger Hosting, and like your host, I have access to my host. 😎.
#2: This is on my
And here, you will find the Hosting Section. Just click “Manage.”

#3: Select “Domain Name” from the upper left option.
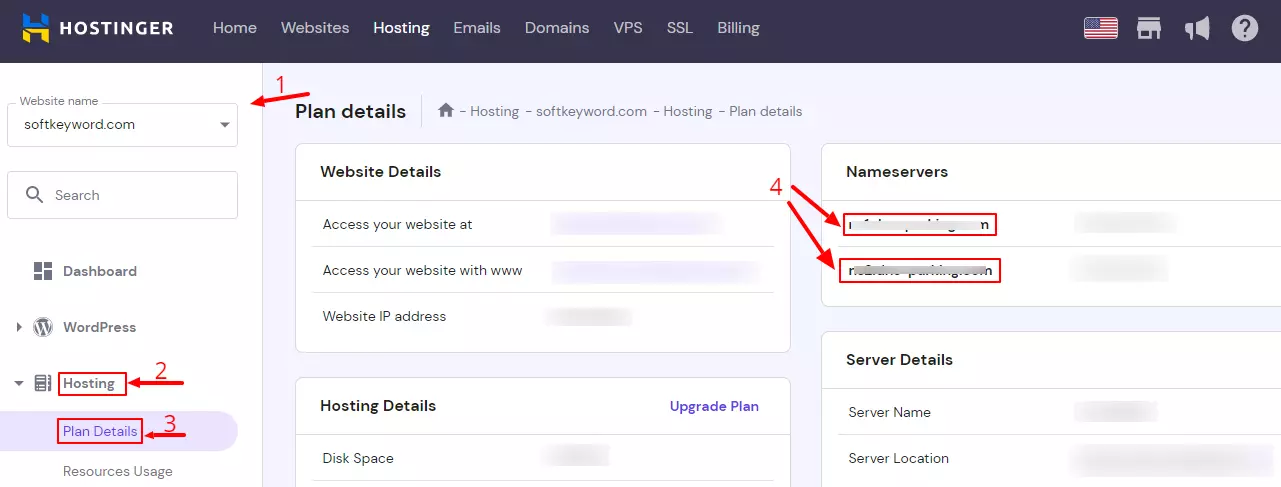
#4: Select the “Accounts > Details” option on the left-hand side, and you will see the important information related to your hosting, including the DNS nameservers.
#5: Copy the DNS nameservers highlighted in the picture and save them in the text file.

It is common for web hosts to provide two or more nameservers. You must enter all these addresses into your domain registrar’s control panel.
The nameservers look similar to this:
ns1.dns-parking.com
ns2.dns-parking.com
Note: Copy the nameservers of your hosting carefully, as your domain will redirect to hosting only when they are pointed or connected correctly.
So check twice.
Now, in further steps… what will we do?
Raise your hand✋ if you know… if not, let me tell you…
We will cover how to link a domain to hosting.
Step #2: Visit your domain name registrar and select the domain to point to.
The next step in connecting the domain name to the web hosting is to replace the domain’s old nameservers.
Now you have to find DNS Management or Name Server Settings. Then change domain nameservers and point to a different provider (GoDaddy, Namecheap, and others).
Here are the steps to do so:
#1: Log in to your NameCheap account (Domain Name Provider’s Account), where you bought your domain.
#2: Go to the “Account Section” on the right-hand side and then to the Domain List.”
In Domain List,” click “Manage” next to the domain name you want to connect with.
How to connect the GoDaddy domain to another GoDaddy hosting?
You can connect the GoDaddy domain using the same process. The difference is only with the user interface and navigation.

Note: Every domain name registrar has a different way of finding the domain name management settings. However, you can generally find this setting option on the menu > Domain Management or Domain Overview.
Step #3: Change Nameservers of Domain Name to link
Now we will use You will find the Nameserver Setting option once you have custom nameservers for your domain.
Now let’s see how to find the DNS name of a server.
How to set custom nameservers?
Now, it’s time to update your name servers to your hosting provider’s name servers.
#1. You will find the Nameserver Setting option once you enter the domain “Manage” page.
#2. There, choose the “Custom Nameservers” option and put the nameservers you copied into the text file from the Web Hosting Provider, and click Save (the tick icon on the right side).
You will need to enter the name servers in the appropriate fields.

It should be written as Nameserver 1 for a nameserver that begins with NS1 and Nameserver 2 for a nameserver that begins with NS2, etc. You should only enter the first two fields of your registrar if your hosting provider only provides you with two nameservers.
After setting up the nameservers, you must wait for the changes to take effect. It typically takes a few hours but can take up to two days.
Now, you have successfully mapped a domain name to your hosting server.
But is your domain name secure?
Well, you need not worry 😢 about that because I have a solution 😃 as a detailed guide on how to protect your domain name.
You can follow and apply the essential steps on how to connect a domain name, which I follow, and make a defense against the attackers.
Wrapping Up
Connecting a domain name to your website with the proper steps and considerations in mind, you’ll be well on your way to establishing your online presence.
So, these were the simple steps. Even if you are a beginner, you can do it very quickly.
Did I miss any steps while connecting a domain name to a web host?
Please let me know in the comment section below.


Hello, my name is Cliff and I wrote a book called What Is Bitcoin? Would love to send you a free copy. What email should I send it to?
Thanks, Cliff. You can simply visit the contact page.
That’s not SK’s YouTube Channel…
It is time to make use of this.
Visual content is the backbone of social media.
Hi,
I’m excited
Having read this I believed it was rather informative. I appreciate you taking the time and effort to put this short article together.
I once again find myself personally spending a significant amount of time both reading and commenting. But so what, it was still worth it!
Thanks, Jared, and keep reading.
Connecting a Domain Name to Hosting was very easy with these Step-by-Step Guide. Thanks 🙂
Keep connected with SoftKeyword, Nancy !